前段时间,随着ios 8的正式发布,需要将公司现有工程移植来适配ios 8,在这里汇总移植过程中遇到的问题和一些ios 8的新特性。
首先介绍兼容ios 8对原有代码的修改:

1、定位服务:

对于定位服务,采用不同的接口调用,原有的CLLocationManager startUpdatingLocation方法在8.0上已经无效。需要调用requestWhenInUseAuthorizationrequestAlwaysAuthorization。两者的区别在于,一个只在app使用时更新位置,一个在app不使用时同样也会更新位置。参照弹出的截图:
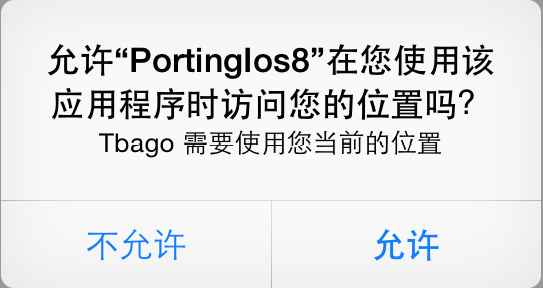
这里附上调用代码,同时,针对旧的Xcode 5编译器做了宏判断,防止xcode 5无法编译:

1
2
3
4
5
6
7
8
9
10
11
12
13
14
    self.locationManager = [[CLLocationManager alloc] init];
self.locationManager.delegate = self;
self.locationManager.desiredAccuracy = kCLLocationAccuracyBest;

SEL selector = NSSelectorFromString(@"requestWhenInUseAuthorization");
if ([self.locationManager respondsToSelector:selector])
{
#ifdef __IPHONE_8_0
[self.locationManager requestWhenInUseAuthorization];
#endif
}
else {
[self.locationManager startUpdatingLocation];
}

同时对于CLLocationManagerDelegate的调用也不同,这里也附上调用区别代码:

1
2
3
4
5
6
7
8
9
10
11
12
13
- (void)locationManager:(CLLocationManager *)manager didChangeAuthorizationStatus:(CLAuthorizationStatus)status
{
#ifdef __IPHONE_8_0
if (status == kCLAuthorizationStatusAuthorizedWhenInUse || status == kCLAuthorizationStatusAuthorizedAlways) {
[self.locationManager startUpdatingLocation];
}
else
#endif
if (status == kCLAuthorizationStatusAuthorized) {
// iOS 7 will redundantly call this line.
[self.locationManager startUpdatingLocation];
}
}

主要就是CLAuthorizationStatus返回值不同,其他没有修改。
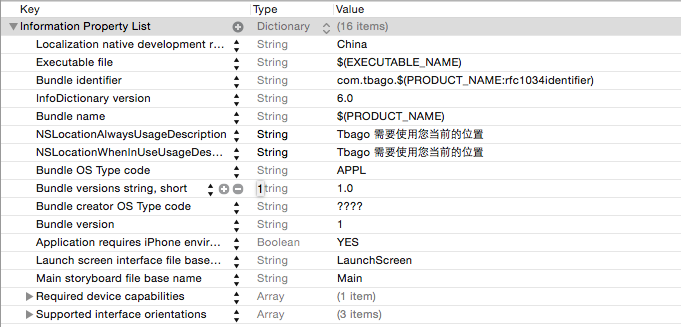
同时参照上面截图,还需要修改info.plist增加NSLocationWhenInUseUsageDescription(对应requestWhenInUseAuthorization)或NSLocationAlwaysUsageDescription(对应requestAlwaysAuthorization),参照如下截图,这里为了方便测试,两个都增加了,实际应用中只需要根据需要选择其中一个:
2、推送服务

对于推送服务,以前的api都被deprecated,参照编译器警告,并且以前的api在ios 8上无效了。这是为了支持新的actionable notifications。就是不需要解锁屏幕和启动app来回复信息,参照下图:

对于自己的项目来说,只需要修改调用方法。参照如下代码:

1
2
3
4
5
6
7
8
9
10
11
12
13
14
15
16
17
18
19
20
21
22
23
24
- (BOOL)application:(UIApplication *)application didFinishLaunchingWithOptions:(NSDictionary *)launchOptions {
// Override point for customization after application launch.

#ifdef __IPHONE_8_0
///= 8.0)
{
UIUserNotificationSettings *settings = [UIUserNotificationSettings settingsForTypes:UIUserNotificationTypeAlert | UIUserNotificationTypeBadge | UIUserNotificationTypeSound categories:nil];
[application registerUserNotificationSettings:settings];
}
else
#endif
{
[application registerForRemoteNotificationTypes:
(UIRemoteNotificationTypeBadge | UIRemoteNotificationTypeSound | UIRemoteNotificationTypeAlert)];
}
return YES;
}

- (void)application:(UIApplication *)application didRegisterUserNotificationSettings:(UIUserNotificationSettings *)notificationSettings
{
if (notificationSettings.types != UIUserNotificationTypeNone) {
[application registerForRemoteNotifications];
}
}

相对于以前的调用方式,多了application:didRegisterUserNotificationSettings:这个回调方法,UIUserNotificationSettings就是我们在application:didFinishLaunchingWithOptions:中设置的的settings。

3、跳到设置应用程序:

对于定位服务,或者推送服务,如果用户点击了”不允许”,以前版本只是简单提示用户不允许使用,同时提示用户到设置程序中修改程序权限,现在可以调用如下方法:

1
[[UIApplication sharedApplication] openURL:[NSURL URLWithString:UIApplicationOpenSettingsURLString]];

通过这个方法可以直接跳转到程序设置界面,方便用户操作。

附:我用来测试的demo代码